Monday, September 27, 2010

Family History and Ancestry Layout for ScrapbookPal


I love doing family history research and the Heritage cartridge from ScrapbookPal has the perfect die-cut images for me to use on my ancestor's scrapbook pages.  I used the images, font, and word features from the Heritage cartridge on this layout.  I think that the hand written font on this cart is awesome and compliments the layout and journaling.  I used it to start the first letter in my journaling as well as the initials on the layout.  I found this drawn picture of my distant great grandmother and a story to go along with it online.  I paraphrased and formatted the story in Microsoft Word so that it would fit on my scrapbook page.

Supplies:
Cardstock: Bazzill
Patterned paper: Imaginisce
Die-cuts: Cricut Expression with Heritage cartridge
Ink: Colorbox Fluid Chalk Cat's Eye in Chestnut Roan
Other: computer and printer, flowers, lace, ribbon, sewing machine and thread

To re-create this layout, use the sizes and color of the cuts listed below:
- Tree cut at 5 3/4 inches in green cardstock
- Wagon cut at 4 inches in brown cardstock
- House cut at 2 1/2 inches in red cardstock
- Bird images cut at 1 1/2 inches in purple cardstock
- Photo corner cut at 2 inches in red cardstock
- Initials cut at 2 inches in purple cardstock
- Silhouette cut at 2 3/4 inches in brown cardstock (with the bottom flourish cut off)

Hand, machine, or faux stitch around the edges of the layout.  Ink the edges on all of the papers and cuts with the Colorbox Fluid Chalk Cat's Eye in Chestnut Roan.  Use a 5 x 7 photo and hand cut the hills at the bottom of the layout by hand.  The journaling block on the left page measures 3 1/2 x 8 1/2 inches and on the right side it is 8 1/2 x 11 inches Refer to the photo for placement of the papers and cuts. 

***A little note about my project.  I had intended to make a paper bag mini album to share with you all, but some sweet, little, creative hands found their way into my scrapping room and helped me 're-create' the album that was almost finished, so I had to make something else to share with you because I didn't have time to make another mini album.  I will make one sometime and share it with you sometime soon!! (View my other paper bag mini albums here)***

Thanks for stopping by!!
Hugs

Thursday, September 23, 2010

Apron Strings Designs Card Kits and A Little Insight

Did you know that Apron Strings Designs has a great monthly card kit on top of their two wonderful monthly scrapbook kits each month??  I had the opportunity to design with the September Card kit this month:


Here are the cards I created with it:


This one includes an add-on (Blooms A Bella) that you can buy
in addition to the kits...add ons ship for free with your kits:


I hope you hop on over to see the wonderful kits this month at Apron Strings Designs and don't forget to check out the fun challenges going on over at the Apron Strings Designs blog.

Here is a little insight about me: 
Maybe you have noticed that I haven't been posting as much lately......I wanted to share with you a little of how my last two weeks have been going.  I found out about 12 days ago that I was 7 weeks pregnant and also that I was threatening miscarriage because of spotting.  My midwife put me on strict bed rest and the spotting was very little to none 6 days later.  On the 7th day, I started to bleed really bad and soon after, I suffered a miscarriage.  I know that God has a plan for me and that little spirit that was ready to come down....maybe the embryo wasn't developing perfectly or maybe this is something that I had to experience at this time.....I don't know exactly, but I do know that when the time is right, that little spirit will be joining our family. 

Thanks for stopping by!!  I hope to be able to get back to a regular posting schedule and I hope that you will stay tuned.....I have a wonderful giveaway and if you have a Cricut machine, you won't want to miss it.

Hugs,

Monday, September 20, 2010

Clean And Simiple With Caardvarks

It is time for a new challenge at the Caardvarks blog.  This time the challenge is Clean and Simple.  We got to work with the new Hero Arts stamp sets for this challenge.  Here are my cards:

This card was so easy....it only took me about 20 minutes to put together.

I hope you will hop on over to the Caardvarks blog and join us for this super fun challenge.

Thanks for stopping by!!
Hugs,

Saturday, September 18, 2010

Peaceful Snowflakes - Twisted Sketches

Time seems to pass slowly at times and so quick at others.  I can hardly believe that it will officially be the first day of fall this week.  Winter isn't that far away.  With that in mind, I created this card from the card sketch this week at Twisted Sketches.


This card is quite big....it measures 4 x 9 inches and I used large snowflakes that I cut on my Cricut with the clear clam shell cases  that I cut from the carts.  I used some acrylic paint on the card for the background and also on the plastic snowflakes.  I blinged them up a little with my i-rock tool.  I hope you will join us this week at Twisted Sketches (they will be having a DT call later this week).

        Supplies-
        Cardstock, ribbon, corner rounder: Stampin' Up!
        Die cuts: Cricut Expression with Winter Wonderland cartridge
        Paint: Making Memories
        Rhinestones: i-rock by Imaginisce
        Pen: Unibal Signo

Thanks for stopping by!!

Wednesday, September 15, 2010

6x6 Recipe Swap - Pumpkin Bars and My Scrapping Weekend

Hello everyone!!  Today I am sharing with you the 6x6 recipe page that I swapped with my friends this last weekend when we all got to together and scrapped at the Scrapbook USA Expo and Archivers. 

Here are the pages that I made....the recipe is one of my family's fall favorites....Pumpkin Bars...

        Cardstock, stamp, pen: Stampin' Up!
        Die cuts: Cricut Expression with Mini Monsters and Lyrical Letters carts
        Ink: Stampin' Up! and Colorbox Fluid Chalk
        Embossing: Cuttlebug
        Button: Sassafras
        Other: butchers twine

I had a great weekend visiting with my friends and seeing some cool products at the Scrapbook USA Expo.  I met some great people....including my darling daughters favorite - Jinger Adams.  Jinger is as sweet and lovely in person as she is on camera.

Jinger Adams and I at the Scrapbook USA Expo

I also see that I have hit 50,000 hits on my blog and I have some very yummy goodies to give away soon, so come back and see what I will have later this week to give away.

Hugs,

Saturday, September 11, 2010

Bicycle Journey Card for ScrapbookPal


Hi everyone!!  I hope your weekend is going great.  This weekend, I am scrapping with some friends that I met online.  We go to the ScrapbookUSA Expo in Sandy, Utah and then spend the day scrapping at a scrapbook store the next day.  I hope to have some fun scrapping stuff to share with you when I get home.

It is my turn today to share on the ScrapbookPal blog a card that I made with the Heritage Cricut cartridge.  There are so many wonderful cuts on this cart such as heritage and pioneer images as well as frames and charms, plus a full font with shadow and some great family words. 

ScrapbookPal also sent me the matching Cuttlebug Heritage Cricut Companion embossing folders and some Smooch accent ink to work with.  I used white cardstock for all the cuts on this card (except the basket on the bike) and just colored them in with the Smooch accent ink.  This was my frist time using the Smooch accent ink and I love the results.  It is a wonderful accent for the die-cuts and gives a great shine.

How to create this card:
-For the card base, cut a piece of kraft colored cardstock to 4 1/4 x 11 inches.  Fold it in half to make a 4 1/4 x 5 1/2 inch card.
-Emboss the card front with one of the embossing folders from the Cuttlebug Heritage Cricut Companion embossing folders and then rub a Colorbox Fluid Chalk Cat's Eye Ink Pad in Chestnut Roan over the embossed image to help it stand out a little.
-Using the Cricut Expression and the Heritage cartridge, cut the bicycle image on page 63 of the handbook at 2 1/4 inches in white.....I did cut out an extra bicycle in brown and then just used the basket from the brown bicycle over the white basket.  I also embossed the brown basket with the corner embossing on the Cuttlebug Heritage Cricut Companion embossing folder before I adhered it to the bike.
-Cut the frame layers on page 63 at 1 inch in white
-Cut the word "JOURNEY" on page 71 at 1/2 inch in white.
-With the Smooch accent ink color in the bicycle frame with Green Apple and wheel spokes with Silver Fox.  Color in the tire, seat and handlebars with a black marker.  Color in the Journey with the Green Apple and the top layer of the frame in Silver fox.  Use the Green Apple Smooch to color two small brads.  The Smooch accent ink really gives the bike and frame a great shine and it dries really fast on paper, but I used my heat gun to speed up the drying process on the brads.
-Layer the frame and add the "JOURNEY" cut to the center of the frame. 
-Assemble the card as shown in the picture.  I did add some dimensional adhesive under the bike to raise it off the card a little bit.
-Tie a white ribbon at the top of the card.

Supplies:
Cardstock, ribbon, brad, dimensional adhesive: Stampin' Up!
Die-cuts: Cricut Expression with Heritage cartridge
Embossing: Cuttlebug with Heritage Companion Cuttlebug embossing folders
Other: Smooch accent ink in Green Apple and Silver Fox

Thanks for visiting!!  I appreciate your comments.
Hugs,

Friday, September 10, 2010

Miss You for 2S4Y

Here is my entry for the sketch this week at 2 Sketches 4 You


ETA: 
I was out of town this weekend and I almost didn't get this card up in time because my battery ran out on my computer and "silly me" for got to take the cords to re-charge it.  So, I quickly got this card up and my dear husband submitted it for me on the 2S4Y website.  So, for the details on this card, I used my Cricut along with the Cindy Loo Cricut cartridge to cut the cat, the "Miss You" and the scallop shape.  For the circle, I used George and Basic Shapes.  Pink, white, dark gray cardstock and ribbon are all Stampin' Up! and the light gray cardstock is Bazzill.  I also used my i-rock for the rhinestone accents.
Thanks for stopping by!!

Sunday, September 5, 2010

What A Week And A New Challenge At Caardvarks

It has been over a week since my last post.  We have been busy with visitors, family reunions, sick kids and mommy, a birthday for my little man, and I sliced my finger open, so I haven't had time (or the energy) to be very crafty lately. 

I do have these cards to share with you for the new Caardvarks Challenge that went up today.  This time it is a sketch challenge and we got to play with the images at Tiffany Doodles.


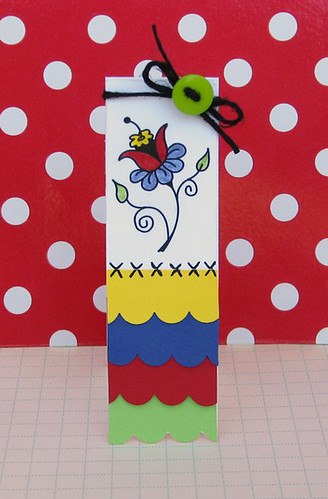
This second one is a scrappling.....just 1 1/4 inches by 4 inches tall........

I hope you will join us for this awesome challenge at the Caardvarks blog.